May 13, 2022
OpenShift Virtualization builds upon KubeVirt to provide a container native home for your virtual machine workloads. While bare metal is the only officially support platform today, this post will walk through enabling OpenShift Virtualization on vSphere in a lab environment. With nested virtualization you’ll be able to spin up containerized VMs bridged to your physical networks.
Understanding OpenShift Virtualization
Why virtual machines in containers?!
As you begin to migrate applications to a containerized, cloud-native platform like OpenShift you begin to realize benefits like portability, repeatability, and automation. Applications hosted on virtual machines may not be practical to containerize or even compatible.
OpenShift Virtualization enables you to run your virtualized workloads on the same platform powering your containerized workloads using a consistent Kubernetes interface.
To experiment with container native virtualization on vSphere let’s begin by enabling a suitable network configuration.
Configuring vSphere Networking for KubeVirt
Virtual machines will attach to the pod network by default. You likely already have several networks plumbed to your ESXi Hosts, and it’s likely you may want to attach your containerized virtual machines to these same networks. Virtual Switch Tagging (VST) and Virtual Guest Tagging (VGT) provide the ability to carry a VLAN tag all the way from the physical rack switch through the vSwitch to a guest.
Adding a PortGroup to vSwitch
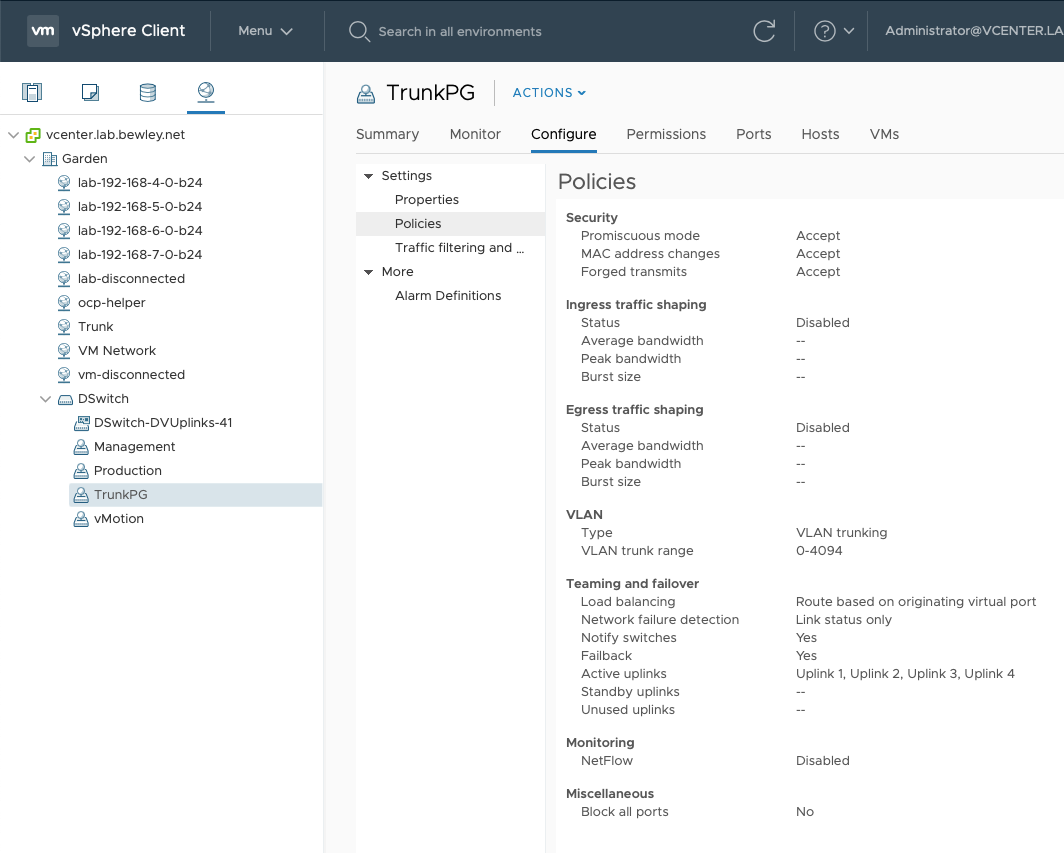
Follow the VMware documentation to configure your standard or distributed vSwitch by adding a PortGroup to carry all the VLANs you would like to be present in the OpenShift Virtualization environment. Configure the portgroup to have vlan type “VLAN trunking” and specify the appropriate VLANs. For a standard vSwitch select 4095 to carry all. For a distributed vSwitch select 0-4094.
⚠️ IMPORTANT Enable promiscuous mode
Switches improve network efficiency by learning where MAC addresses are and not sending traffic where it isn’t needed. Because our virtual machines will be using MAC addresses that vSphere does not know about you will see failures such as no response to DHCP or ARP requests unless you modify the security settings of the network or PortGroup.
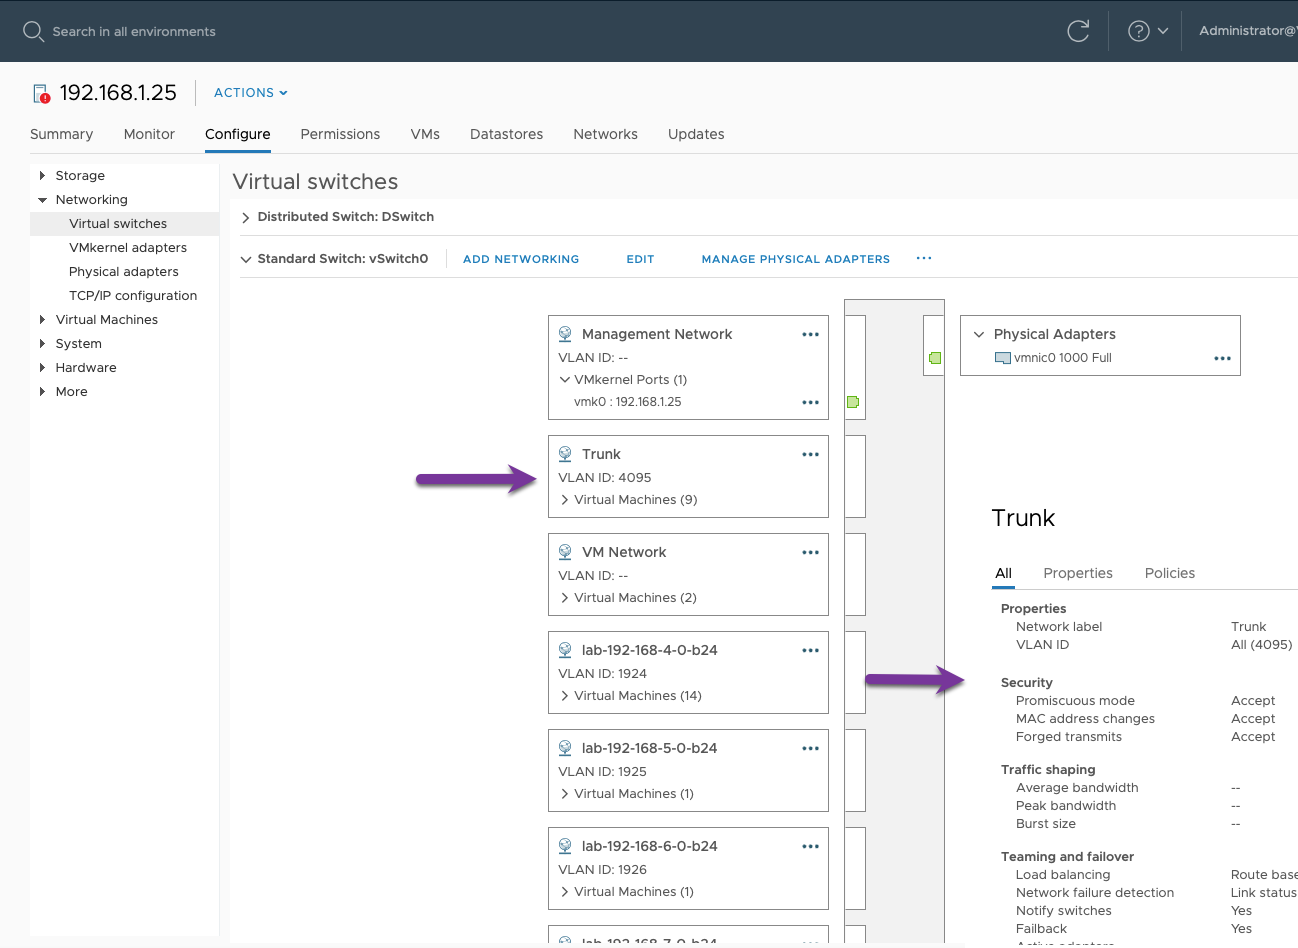
Trunk Port Group for Standard vSwitch
Why did we do that?
Now we can create guests for our OpenShift nodes which have a 2nd network interface card. When this NIC is attached to the newly created “Trunk” port group it will receive an an 802.1Q trunk from the vSwitch. The VLANs on that trunk may then be split back out to bridges in the node which provide connectivity to containerized virtual machines.
Customizing the OpenShift RHCOS Node Template
First, let’s restate what we are going to achieve: A virtual machine in a container on a virtual machine on a physical ESXi host. For this to work, our Guest (OpenShift Node) running in vSphere needs to know how to “do virtualization”.
Things are beginning to feel a bit recursive. 😵 Don’t worry. We’ll get there.
It all starts with a template…
Cloning the Existing RHCOS Template as a VM
The OpenShift Machine API operator builds nodes in vSphere by cloning a guest template that was created during cluster installation. This template does not include settings required for nested virtualization.
Clone the “*rhcos” template to a virtual machine so that it is possible to make edits. Give the VM a name that matches the template with “-cnv” on the end. So “hub-7vxwj-rhcos” becomes “hub-7vxwj-rhcos-cnv”.
📓 We are using “cnv” as shorthand for Container Native Virtualization which predates the OpenShift Virtualization name.
Customizing the Temporary VM
This VM is temporary. Don’t boot it. We just want to use it to make some changes that aren’t possible to make on a static template.
Make These Changes
- Enable these CPU features: Hardware virtualization, IOMMU, Performance counters
- Add a 2nd NIC attached to the
Trunkportgroup
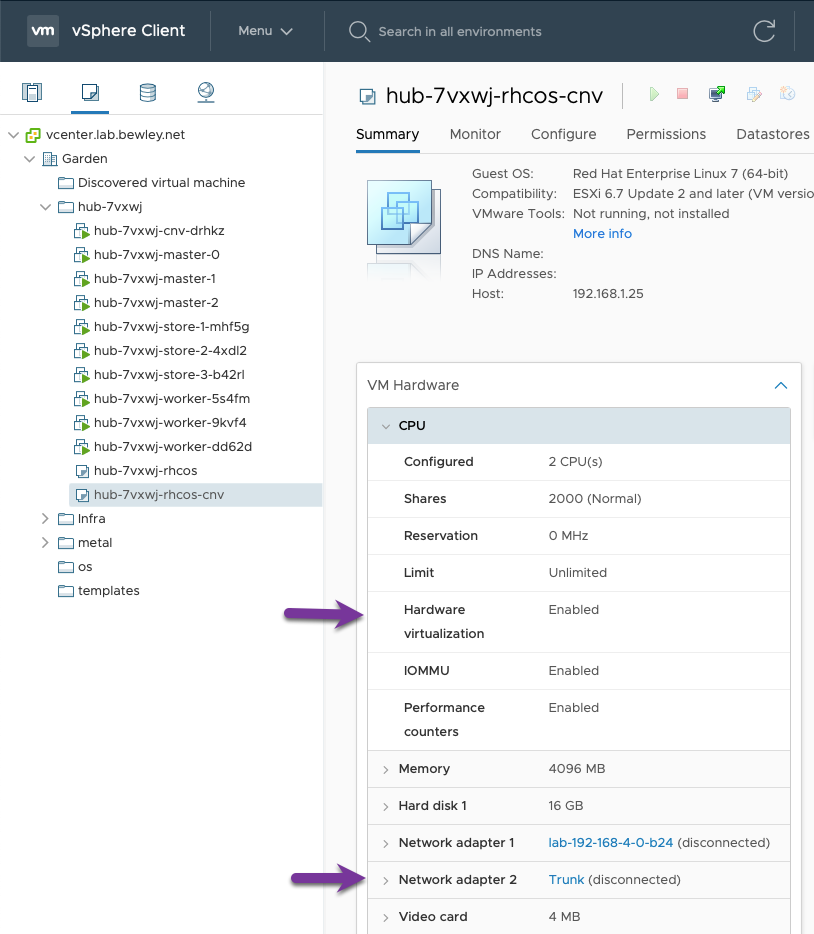
CNV Node Template with Customizations
Converting the Customized VM to a Template
Once these changes have been made, convert this VM to a template. Keep the same hub-7vxwj-rhcos-cnv name.
Creating a Machineset for Hypervisors
How do we tell OpenShift to use this template?
MachineSets define how many machines to provision as worker nodes and exactly how to build them.
Based on the existing worker machineset, create a new one that is CNV specific. This machineset will use the newly created template.
# copy existing worker machineset
INFRA_ID=$(oc get infrastructure/cluster -o jsonpath='{.status.infrastructureName}')
echo $INFRA_ID
hub-7vxwj
oc get machineset/${INFRA_ID}-worker -n openshift-machine-api -o yaml > ${INFRA_ID}-cnv.yaml
# modify to look like the example below and create it
vi ${INFRA_ID}-cnv.yaml
oc create -f ${INFRA_ID}-cnv.yaml -n openshift-machine-api
📓
MachineSetFor Workers With VirtualizationNotice that line 48 refers to the
Trunkport group and line 35 refers to the virtual machine templatehub-7vxwj-rhcos-cnvcreated above.
 1apiVersion: machine.openshift.io/v1beta1
 2kind: MachineSet
 3metadata:
 4  annotations:
 5    machine.openshift.io/memoryMb: '16384'
 6    machine.openshift.io/vCPU: '12'
 7  name: hub-test-cnv
 8  namespace: openshift-machine-api
 9  labels:
10    machine.openshift.io/cluster-api-cluster: hub-kmbtb
11spec:
12  replicas: 1
13  selector:
14    matchLabels:
15      machine.openshift.io/cluster-api-cluster: hub-kmbtb
16      machine.openshift.io/cluster-api-machineset: hub-test-cnv
17  template:
18    metadata:
19      labels:
20        machine.openshift.io/cluster-api-cluster: hub-kmbtb
21        machine.openshift.io/cluster-api-machine-role: worker
22        machine.openshift.io/cluster-api-machine-type: worker
23        machine.openshift.io/cluster-api-machineset: hub-test-cnv
24    spec:
25      lifecycleHooks: {}
26      metadata:
27        labels:
28          machine.openshift.io/cluster-api-machineset: hub-test-cnv
29      providerSpec:
30        value:
31          apiVersion: machine.openshift.io/v1beta1
32          kind: VSphereMachineProviderSpec
33          metadata:
34            creationTimestamp: null
35          template: hub-kmbtb-rhcos-cnv
36          numCPUs: 12
37          numCoresPerSocket: 1
38          memoryMiB: 16384
39          diskGiB: 90
40          snapshot: ''
41          userDataSecret:
42            name: worker-user-data
43          credentialsSecret:
44            name: vsphere-cloud-credentials
45          network:
46            devices:
47              - networkName: lab-192-168-4-0-b24
48              - networkName: Trunk
49          workspace:
50            datacenter: Garden
51            datastore: VMData-HD
52            folder: /Garden/vm/hub-kmbtb
53            resourcePool: /Garden/host/Goat/Resources
54            server: vcenter.lab.bewley.net
Configuring OpenShift Virtualization Networking
Install NMState Operator using the web UI or GitOps and this repo
Once installed, create a NMState resource and more nmstat.io APIs will become available.
$ oc api-resources | grep -i nmstate
nmstateconfigs                                agent-install.openshift.io/v1beta1    true     NMStateConfig
nmstates                                      nmstate.io/v1                         false    NMState

$ cat <<EOF | oc create -f -
apiVersion: nmstate.io/v1beta1
kind: NMState
metadata:
  name: nmstate
spec:
  nodeSelector:
    beta.kubernetes.io/arch: amd64
EOF

$ oc api-resources |grep -i nmstate
nmstateconfigs                                agent-install.openshift.io/v1beta1    true     NMStateConfig
nmstates                                      nmstate.io/v1                         false    NMState
nodenetworkconfigurationenactments    nnce    nmstate.io/v1beta1                    false    NodeNetworkConfigurationEnactment
nodenetworkconfigurationpolicies      nncp    nmstate.io/v1                         false    NodeNetworkConfigurationPolicy
nodenetworkstates                     nns     nmstate.io/v1beta1                    false    NodeNetworkState
Install OpenShift Virtualization using the web UI or GitOps and this repo.
Once installed create a Hyperconverged resource.
📓 nmstate.io API Group Resources for node network configuration
$ oc api-resources --api-group nmstate.io
NAME                                 SHORTNAMES   APIVERSION           NAMESPACED   KIND
nmstates                                          nmstate.io/v1        false        NMState
nodenetworkconfigurationenactments   nnce         nmstate.io/v1beta1   false        NodeNetworkConfigurationEnactment
nodenetworkconfigurationpolicies     nncp         nmstate.io/v1        false        NodeNetworkConfigurationPolicy
nodenetworkstates                    nns          nmstate.io/v1beta1   false        NodeNetworkState
Creating a Node Network Configuration Policy
If we want to use all the VLANs we are trunking to a node, we need to tell OpenShift how to configure the NIC for all those networks. Using resources from the NMState API we can configure the networking in the node operating system.
Create a NodeNetworkConfigurationPolicy that will be used to configure the 2nd NIC for us in a way that will present each VLAN as a bridge.
You may optionally log in to the node using oc debug node or ssh, and look at the current network settings before making changes.
Notice in this case that the 2nd NIC ens224 exists, but it has no useful configuration.
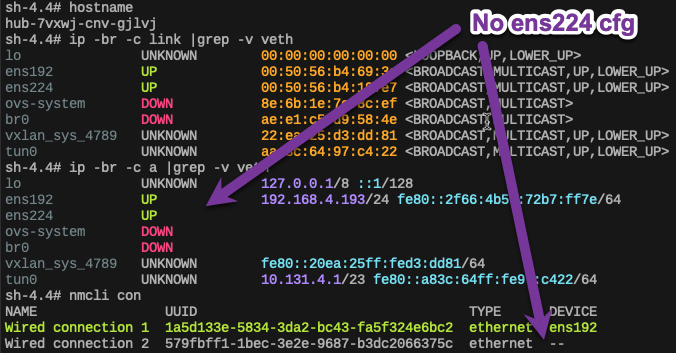
Node Network before NNCP
📓
NodeNetworkConfigurationPolicyFor Workers With VirtualizationNotice on line 7 we are checking for a label that is common to the nodes with virtualization support. This will ensure our NNCP is applied only to the appropriate nodes.
  1apiVersion: nmstate.io/v1beta1
  2kind: NodeNetworkConfigurationPolicy
  3metadata:
  4  name: ens224-policy
  5spec:
  6  nodeSelector:
  7    machine.openshift.io/cluster-api-machineset: hub-7vxwj-cnv
  8  desiredState:
  9    interfaces:
 10
 11      # defined only to facilitate disabling DHCP
 12      - name: ens224
 13        type: ethernet
 14        state: up
 15        ipv4:
 16          enabled: false
 17        ipv6:
 18          enabled: false
 19
 20      # trans proxy
 21      - name: ens224.1925
 22        type: vlan
 23        state: up
 24        vlan:
 25          base-iface: ens224
 26          id: 1925
 27        ipv4:
 28          enabled: false
 29        ipv6:
 30          enabled: false
 31      - name: br-1925
 32        type: linux-bridge
 33        state: up
 34        ipv4:
 35          enabled: false
 36        ipv6:
 37          enabled: false
 38        bridge:
 39          options:
 40            stp:
 41              enabled: false
 42          port:
 43          - name: ens224.1925
 44            vlan: {}
 45
 46      # disco
 47      - name: ens224.1926
 48        type: vlan
 49        state: up
 50        vlan:
 51          base-iface: ens224
 52          id: 1926
 53        ipv4:
 54          enabled: false
 55        ipv6:
 56          enabled: false
 57      - name: br-1926
 58        type: linux-bridge
 59        state: up
 60        ipv4:
 61          enabled: false
 62        ipv6:
 63          enabled: false
 64        bridge:
 65          options:
 66            stp:
 67              enabled: false
 68          port:
 69          - name: ens224.1926
 70            vlan: {}
 71
 72      # metal
 73      - name: ens224.1927
 74        type: vlan
 75        state: up
 76        vlan:
 77          base-iface: ens224
 78          id: 1927
 79        ipv4:
 80          enabled: false
 81        ipv6:
 82          enabled: false
 83      - name: br-1927
 84        type: linux-bridge
 85        state: up
 86        ipv4:
 87          enabled: false
 88        ipv6:
 89          enabled: false
 90        bridge:
 91          options:
 92            stp:
 93              enabled: false
 94          port:
 95          - name: ens224.1927
 96            vlan: {}
 97
 98      # provisioning
 99      - name: ens224.1928
100        type: vlan
101        state: up
102        vlan:
103          base-iface: ens224
104          id: 1928
105        ipv4:
106          enabled: false
107        ipv6:
108          enabled: false
109      - name: br-1928
110        type: linux-bridge
111        state: up
112        ipv4:
113          enabled: false
114        ipv6:
115          enabled: false
116        bridge:
117          options:
118            stp:
119              enabled: false
120          port:
121          - name: ens224.1928
122            vlan: {}
⚠️ Ambiguous Kubevirt Labels
Ideally, we could rely on a label like kubevirt.io/scheduleable: “true”, but in my experience that label is not unique to hosts having virtualization extensions. I have opened a bug to find out more. https://bugzilla.redhat.com/show_bug.cgi?id=2081133
Confirming Node Networking Configuration Changes
After creation of the NodeNetworkConfigurationPolicy, a NodeNetworkConfigurationEnablement will be created for each node that satisfies the node selector in the policy. (machine.openshift.io/cluster-api-machineset: hub-7vxwj-cnv)
$ oc get nodes -l machine.openshift.io/cluster-api-machineset=hub-7vxwj-cnv
NAME                  STATUS   ROLES    AGE    VERSION
hub-7vxwj-cnv-drhkz   Ready    worker   162m   v1.23.5+9ce5071

$ oc create -f nodenetworkconfigurationpolicy.yaml
nodenetworkconfigurationpolicy.nmstate.io/ens224-policy created

$ oc get nnce
NAME                                STATUS
hub-7vxwj-cnv-drhkz.ens224-policy   Available
Now that the NNCE is status Available, optionally log back into the node and take a look at the network configuration.
Woah! Look at all those interfaces on ens224!
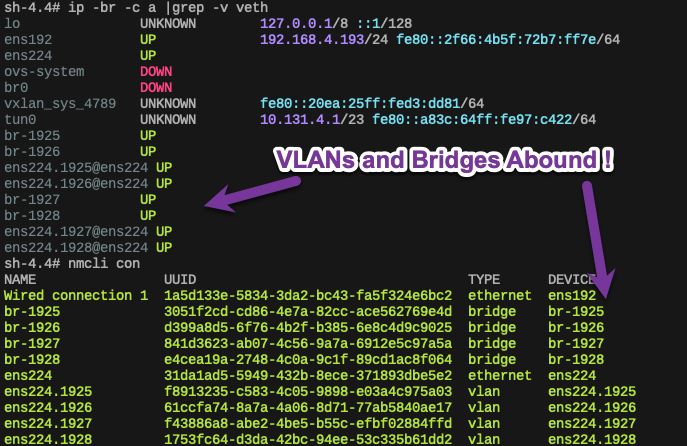
Node Network after NNCE
📓 Node Network Debugging
Attaching a Containerized Virtual Machine to a VLAN
All the work above occurred at the cluster level by a cluster admin. Further configuration takes place within the namespaces that host the virtual machines.
Configuring OpenShift Namespace Networking for VMs
For developers to attach CNV virtual machines to the networks plumbed above, we need to create points of attachment in the namespaces they are privileged to.
The NetworkAttachmentDefinition resource provides virtual machines a logical reference to the network interfaces we created previously.
$ oc api-resources --api-group k8s.cni.cncf.io
NAME                             SHORTNAMES       APIVERSION           NAMESPACED   KIND
network-attachment-definitions   net-attach-def   k8s.cni.cncf.io/v1   true         NetworkAttachmentDefinition

$ oc explain network-attachment-definition
KIND:     NetworkAttachmentDefinition
VERSION:  k8s.cni.cncf.io/v1

DESCRIPTION:
     NetworkAttachmentDefinition is a CRD schema specified by the Network
     Plumbing Working Group to express the intent for attaching pods to one or
     more logical or physical networks. More information available at:
     https://github.com/k8snetworkplumbingwg/multi-net-spec
📓
NetworkAttachmentDefinitionEnabling access to provisioning bridge.Enables VMs in a namespace to attach to a network using CNI.
 1apiVersion: k8s.cni.cncf.io/v1
 2kind: NetworkAttachmentDefinition
 3metadata:
 4  annotations:
 5    description: Provisioning Bridge V1928
 6    k8s.v1.cni.cncf.io/resourceName: bridge.network.kubevirt.io/br-1928
 7  name: vlan-1928
 8  namespace: provisioning
 9spec:
10  config: |-
11    {
12      "name": "vlan-1928",
13      "cniVersion": "0.3.1",
14      "plugins": [
15        {
16          "type": "cnv-bridge",
17          "bridge":"br-1928",
18          "vlan":1928,
19          "ipam":{}
20        },
21        {
22          "type": "cnv-tuning"
23        }
24      ]
25    }
Let’s create an attachment to the provisioning network on bridge br-1928.
$ oc new-project provisioning
$ oc create -f net-attach-def.yaml -n provisioning

$ oc get net-attach-def -n provisioning
NAME        AGE
vlan-1928   1m
Once the network attachment definition is available, a VM can be launch using this network on a bridged interface.
Creating a Containerized VM
I’ll leave the details of creating and using VMs in OpenShift for another time, but I will complete the example.
Create a virtual machine in the OpenShift console, and customize the VM by adding a 2nd NIC. Select the vlan-1928 network attachment definition created above.
📓 Select The Proper Namespace
Remember that network attachment definitions are namespace scoped, as are VMs. Select the provisioning namespace when creating the virtual machine.
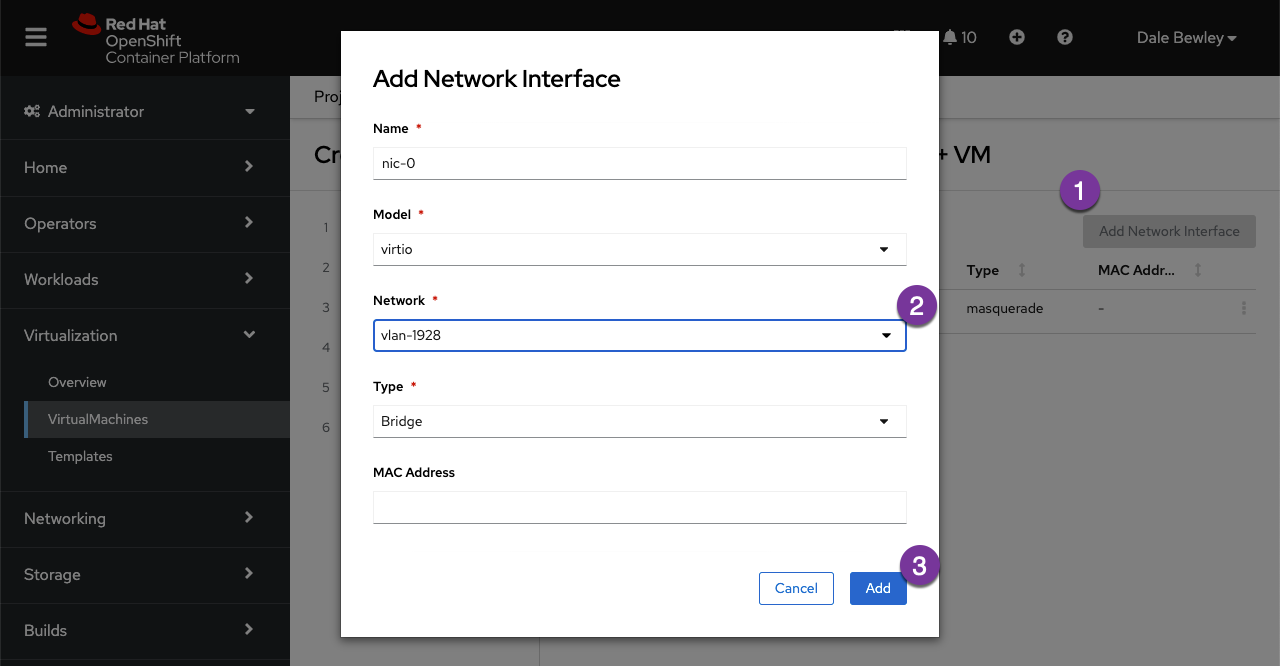
VM Dialog: Add 2nd NIC
After booting and logging into the VM, it can be seen that the eth1 NIC obtained an IP address from the DHCP server on the provisioning LAN.

VM console showing eth1 Provisioning LAN
Summary
Having enabled CPU virtualization extensions on the virtual machine template and adding trunk support to the vswitch you can now launch virtual machines in your OpenShift cluster on vSphere with access to your lab networks.
This is a great way to explore OpenShift Virtualization and experiment with its features as you architect a production use case that leverages bare-metal nodes at a greater scale.
Have fun!