February 15, 2020
OpenShift Containter Platform 4 is much more like Tectonic than OpenShift 3. Particularly when it comes to installation and node management. Rather then building machines and running an Ansible playbook to configure them you now have the option of setting a fewer paramters in an install config running an installer to build and configure the cluster from scratch.
I would like to illustrate how the basics of the networking might look when installing OpenShift on OpenStack. I also wanted an excuse to try out a new iPad sketch app. These notes are based on recent 4.4 nightly builds on OSP 13 Queens.
OpenStack
Cloud Config
Modify your openstack client config to define a cacert.
This step is vital for the bootstrap process to sucessfully download its ignition bundle (fancy new cloud-init thingy) used to configure the machines.
Maybe your OpenStack client config looks like this. In that case ensure that ca.crt.pem is placed in the current working directory when you run the openshift-install command.
~/.config/openstack/clouds-public.yaml
public-clouds:
  overcloud:
    cacert: 'ca.crt.pem' # file path readable by installer
    auth_type: password
    identity_api_version: '3'
    auth:
      auth_url: 'https://openstack.example.com:13000/v3'
    interface: public
~/.config/openstack/clouds.yaml
clouds:
  shiftstack:
    profile: overcloud
    auth:
      project_name: shiftstack
      user_domain_name: Default
      project_domain_name: Default
  admin:
    profile: overcloud
    auth:
      project_name: admin
      user_domain_name: Default
      project_domain_name: Default
~/.config/openstack/secure.yaml
clouds:
  shiftstack:
    auth:
      username: 'shiftstack'
      password: 'password'
  admin:
    auth:
      username: 'admin'
      password: 'password'
Project Creation
First create an OpenStack project and user. I use some Ansible for this that I have not posted yet.
Create project shiftstack and adjust quota as needed.
Create user shiftstack with role swiftoperator and temp URL ability
$ openstack --os-cloud=admin project create --description OpenShift --enable shiftstack
$ openstack --os-cloud=admin user create --project shiftstack --enable --password password shiftstack
$ openstack --os-cloud=admin role add --user shiftstack --project shiftstack swiftoperator
$ openstack --os-cloud=shiftstack object store account set --property Temp-URL-Key=superkey

$ openstack --os-cloud=admin role assignment list --project shiftstack --names
+---------------+--------------------+-------------+--------------------+--------+-----------+
| Role          | User               | Group       | Project            | Domain | Inherited |
+---------------+--------------------+-------------+--------------------+--------+-----------+
| swiftoperator | shiftstack@Default |             | shiftstack@Default |        | False     |
| _member_      | shiftstack@Default |             | shiftstack@Default |        | False     |
| _member_      | admin@Default      |             | shiftstack@Default |        | False     |
+---------------+--------------------+-------------+--------------------+--------+-----------+
- Create a flavor meeting the requirements
Networking
The OpenShift installer takes advantage of OpenStack Neutron featues including
ports
 and floating IPs.
Floating IPs
Before starting the installation process we must establish 2 IP addresses which will be used to access the OpenShift cluster externally. These will necessarily be Neutron floating IPs.
You might typically think of floating IPs as being assigned to a virtual machine instance, but these will be assigned to Neutron ports that exist even if there are no machines.
Create 2 floating IPs and make note of them.
$ openstack floating ip create --description "API osp-nightly.os.example.com" floating
$ openstack floating ip create --description "Ingress osp-nightly.os.example.com" floating
# here is what we got
$ export API_FIP=192.0.2.61
$ export INGRESS_FIP=192.0.2.52
You could use your local /etc/hosts file for testing, but otherwise you will need to create some DNS records. I have already created a dynamic DNS zone called os.example.com and defined a key that nsupdate can use to inject the required A records.
$ export CLUSTER_NAME=osp-nightly
$ cat <<EOF | nsupdate -v -k Kos.example.com.key
update add api.${CLUSTER_NAME}.os.example.com 300 A $API_FIP
update add *.apps.${CLUSTER_NAME}.os.example.com 300 A $INGRESS_FIP
send
EOF
The API load balancer floating IP should also go into the install-config.yaml at /openstack/lbFloatingIP. There is more to be said on the install config later.
The installer will create a private node network 10.0.0.0/24 and a router joining this network to the external network you identify as holding your floating IPs.
Ports
In addition to the 2 floating IPs we created, the installer creates 3 Neutron ports to serve as holders of the highly available cluster virtual IPs which provide three functions. These will be on the created private network and have the following well defined IPs by default.
- API 10.0.0.5
- DNS 10.0.0.6
- Ingress 10.0.0.7
This is all well explained in the OpenStack IPI Networking Infrastructure doc. The Bare Metal IPI Networking Infrastructure doc is also highly relevant.
These neutron ports own the private VIP addresses that are keepalived managed even while the machines participating in VRRP change their priorities or come and go.
Install Config
Now we have to gather all the configuration details necessary for the installation.
First create an install-config.yaml. This will run you through an interactive dialog where you will pick your provider (openstack of course), your cloud or project, your ssh key, the external network that holds your floating IPs, and your flavor.
$ openshift-insall create install-config --log-level=debug --dir=osp-nightly
Now you must modify the file just created at osp-nightly/install-config.yaml.
Even though OpenShift 4.3 was announced with OpenStack support, there have been a lot of issues that affect clouds using self-signed certificates for their OpenStack endpoint. It seems to me that would be the norm for an enterprise and therefore OpenStack was not fully supported. This is all good now, but must you make your CA cert available in two ways. One is within the install-config.
Edit install-config.yaml and:
- Add the
$API_FIPat/openstack/lbFloatingIP - Add your enterprise CA cert at
/additionalTrustBundle - Generate a pull secret and add it at
/pullSecret - Add your ssh key at
/sshKey
Important! Back up your install-config.yaml now. The install process will delete your install-config.yaml! I do not know why that choice was made.
Installation
Bootstrap
And finally, here is where I can show off my Apple Pencil lack of skills! And where we will run the installer.
Kick off the cluster installation:
openshift-install create cluster --log-level=debug --dir=osp-nightly
The openshift-install tool leverages Terraform to produce Installer Provisioned Infrastructure. It will create a bootstrap node first.
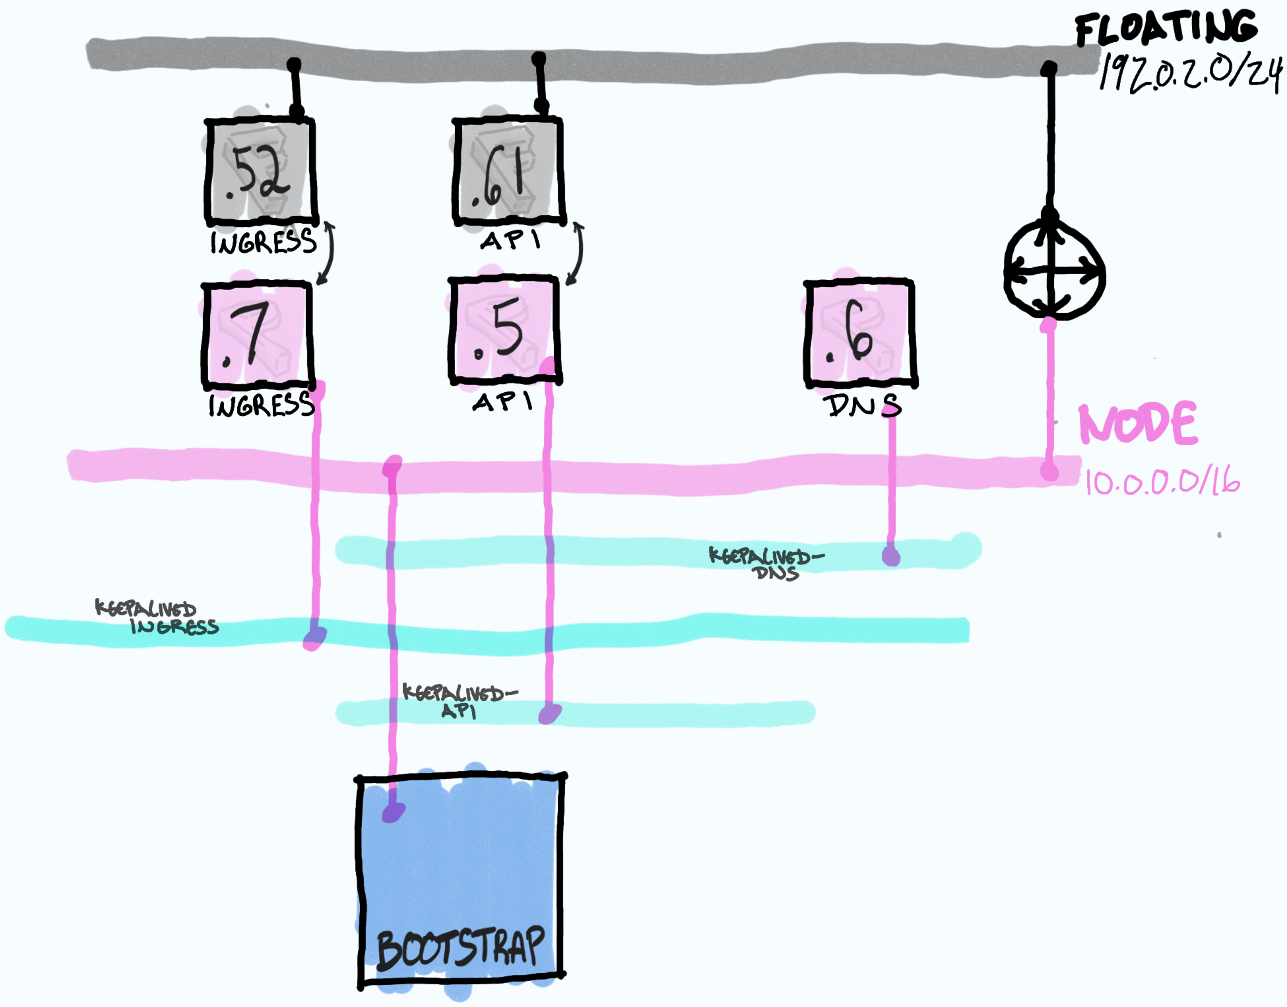
This node will be configured to run a tiny 1 node OpenShift cluster, which only exists as a mechanism to serve out the configurations required by the actual cluster being built shortly after. This may remind you of the TripleO Undercloud / Overcloud model.
When the bootstrap node is first created, it is the only member of all three VRRP or keepalived instances. I try to indicate this by showing the network connection passing through all three blue keepalived “domains”.
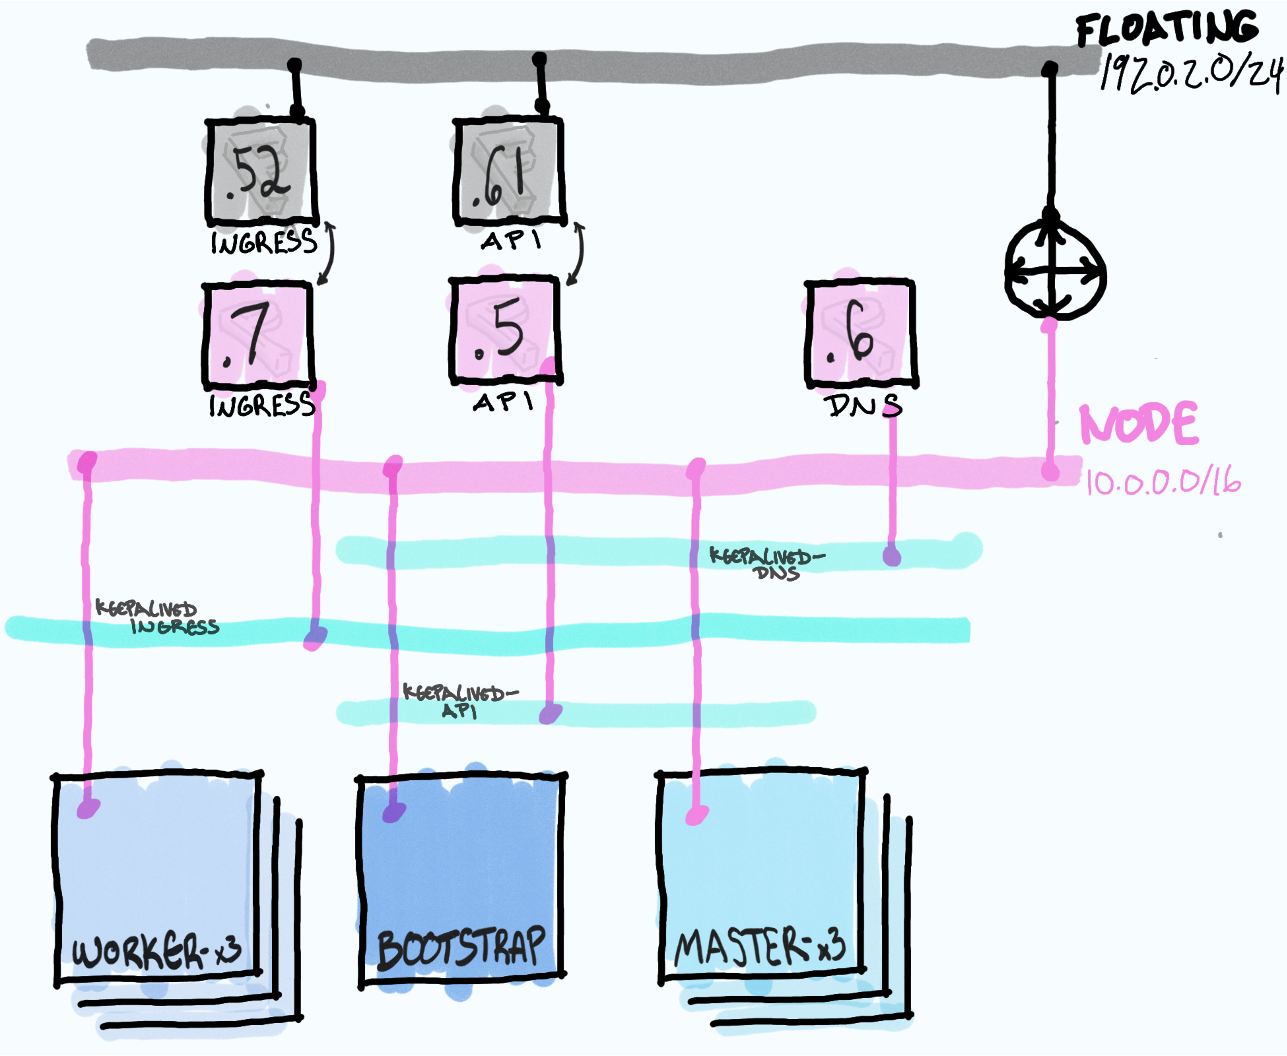
Once the bootstrap node is running a small cluster it will be reachable via the API port on 10.0.0.5 and the floating IP 192.0.2.61. The installer (Terraform) will then connect again to OpenStack and build 3 master nodes.
The masters will obtain their configuration from the bootstrap node and execute the machine config operator which will connect to the OpenStack API to build worker nodes. This step would fail if your cacert is not obtained from your clouds.yaml.
$ openstack console log show --lines 10 <boostrap node> # see TLS errors
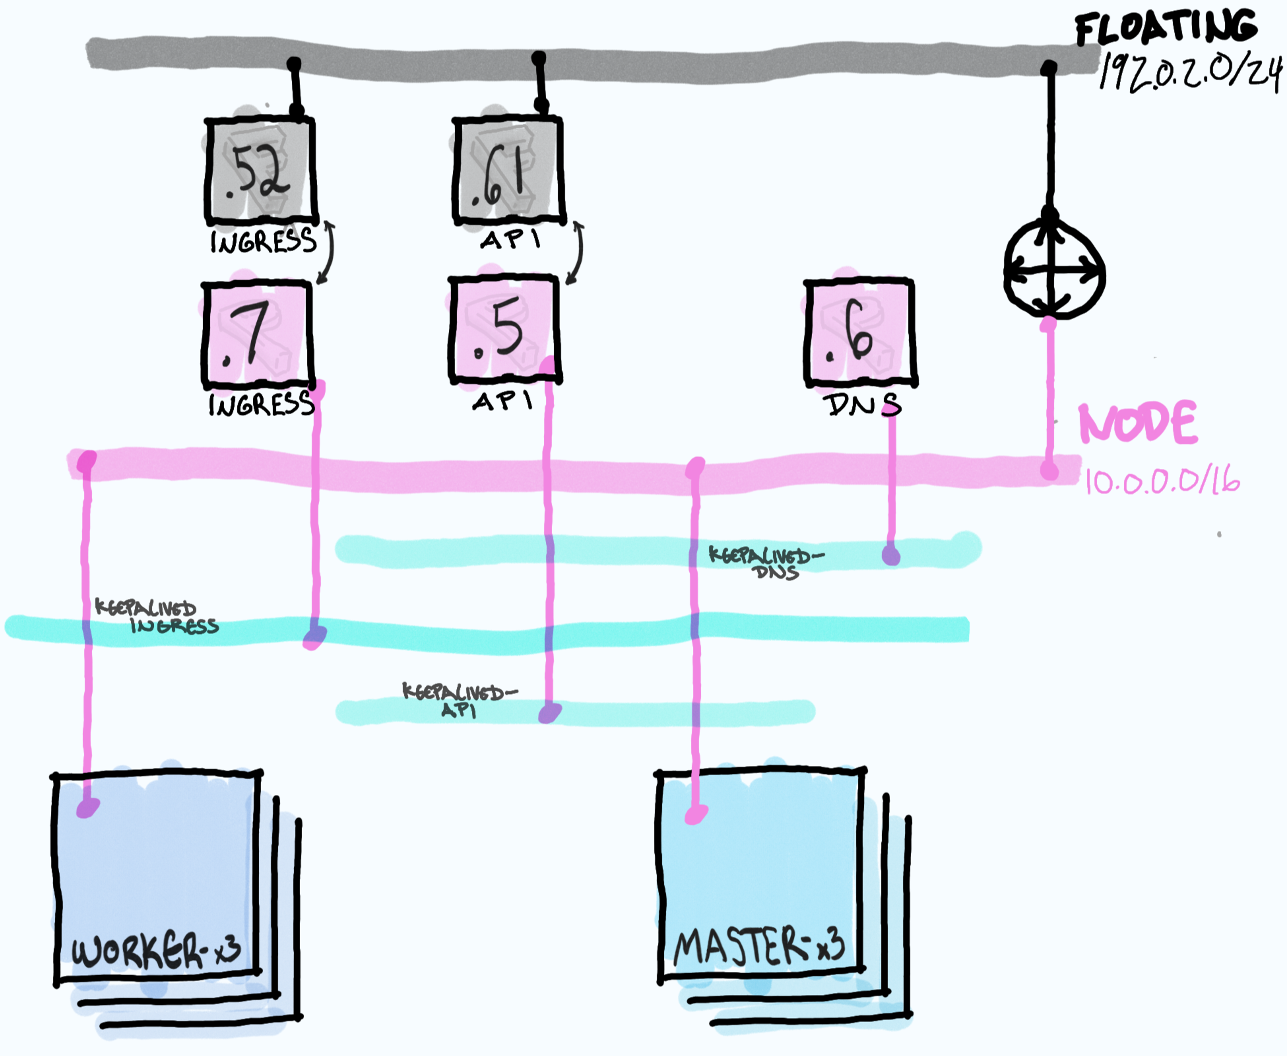
The bootstrap node will ultimatly be deleted once the actual cluster is up leaving behind only the masters and worker nodes to participate in VRRP and handle traffic for the VIPs. This is unlike TripleO wich leaves uses the director machine to manage the overcloud.
Ingress Floating IP
Finally while the association of the API floating IP to the API port is automatically handled by the installer process, the ingress floating IP must be assocated by hand.
$ export CLUSTER_ID=`jq -r .infraID osp-nightly/metadata.json`

$ export API_FIP=192.0.2.61
$ export API_PORT="${CLUSTER_ID}-api-port"

$ export INGRESS_FIP=192.0.2.52
$ export INGRESS_PORT="${CLUSTER_ID}-ingress-port"

$ openstack --os-cloud=shiftstack floating ip set --port $INGRESS_PORT $INGRESS_FIP
And here is a look at the final port and FIP assignments
$ openstack --os-cloud=shiftstack floating ip list \
    -c 'Floating IP Address' -c 'Fixed IP Address' -c 'Port' -c 'Floating Network'
+---------------------+------------------+-----------+--------------------------------------+
| Floating IP Address | Fixed IP Address | Port      | Floating Network                     |
+---------------------+------------------+-----------+--------------------------------------+
| 192.0.2.61          | 10.0.0.5         | 0f46db1c- | c95e1f09-fe50-4837-99d7-cf9b1c3195c1 |
| 192.0.2.52          | 10.0.0.7         | 3718f842- | c95e1f09-fe50-4837-99d7-cf9b1c3195c1 |
+---------------------+------------------+-----------+--------------------------------------+

$ openstack --os-cloud=shiftstack port list \
    -c ID -c Name -c Status -c 'Fixed IP Addresses'
+-----------+---------------------------------+--------+-----------------------------------------------+
| ID        | Name                            | Status | Fixed IP Addresses                            |
+-----------+---------------------------------+--------+-----------------------------------------------+
| 0b2caa8a- |                                 | ACTIVE | ip_address='10.0.0.11', subnet_id='815d5df0-' |
| 0f46db1c- | osp-nightly-bwgwq-api-port      | DOWN   | ip_address='10.0.0.5', subnet_id='815d5df0-'  | <--
| 1ce57420- | osp-nightly-bwgwq-worker-bn9l8  | ACTIVE | ip_address='10.0.0.14', subnet_id='815d5df0-' |
| 30c790a3- | osp-nightly-bwgwq-master-port-0 | ACTIVE | ip_address='10.0.0.16', subnet_id='815d5df0-' |
| 3718f842- | osp-nightly-bwgwq-ingress-port  | DOWN   | ip_address='10.0.0.7', subnet_id='815d5df0-'  | <--
| 5120e5fe- | osp-nightly-bwgwq-worker-7qksj  | ACTIVE | ip_address='10.0.0.18', subnet_id='815d5df0-' |
| 7e8b29a4- | osp-nightly-bwgwq-worker-5ptpq  | ACTIVE | ip_address='10.0.0.26', subnet_id='815d5df0-' |
| ab61d063- | osp-nightly-bwgwq-master-port-2 | ACTIVE | ip_address='10.0.0.23', subnet_id='815d5df0-' |
| b322ad7a- |                                 | ACTIVE | ip_address='10.0.0.12', subnet_id='815d5df0-' |
| bd3fa5ea- |                                 | ACTIVE | ip_address='10.0.0.10', subnet_id='815d5df0-' |
| d0b6eb02- | osp-nightly-bwgwq-master-port-1 | ACTIVE | ip_address='10.0.0.15', subnet_id='815d5df0-' |
| febae668- |                                 | ACTIVE | ip_address='10.0.0.1', subnet_id='815d5df0-'  |
+-----------+---------------------------------+--------+-----------------------------------------------+