May 18, 2021
Adding support for Windows nodes in your OpenShift cluster is a day 2 operation that requires preparation at install time. It is important to accommodate the hybrid networking requirements for Windows Kubernetes nodes. Azure specific tasks and gotchas are highlighted in this part 1 of 3 while laying the groundwork applicable to deploying OpenShift on any provider in preparation for managing Windows containers.
📓 This is part 1 of a 3 part series on OpenShift support for Windows containers. Parts: 1, 2, 3
Combining Linux and Windows Workloads

OpenShift 4.7 enhances the support for Windows Containers. We will begin exploring this support by installing an OpenShift cluster on Azure while enabling hybrid networking with OVN-Kubernetes required for mixed Linux and Windows worker nodes.
Before installation we must meet a few prerequisites and gather some bits together. Let’s start with our cloud provider configuration. In this case that is Azure.
Configuring Your Azure Subscription for OpenShift Installation
The documentation on Configuring an Azure account contains complete details. To summarize, we need to:
Configuring the Azure Command Line Interface
You’ll need a paid Azure account with an active subscription. If you don’t have that yet, head over to the Azure Setup Guide.
We are living the GUI Free Life, so let’s set up your CLI before you even think about that GUI. The Azure CLI Docs describe installing the CLI in any OS. We will setup Azure CLI on MacOS using brew.
While we’re at it let’s go ahead and create a Resource Group called ocp in the westus region, and set that as our default.
$ brew install azure-cli

$ az login
$ az group create -l westus -n ocp
$ az configure --defaults group=ocp

$ cat ~/.azure/config
[cloud]
name = AzureCloud
[defaults]
group = ocp

$ cat ~/.azure/clouds.config
[AzureCloud]
subscription = 12345678-9000-0000-0000-000000000000
You may want to pause here and check out the getting started with the Azure CLI documentation.
Adjusting Azure Quotas and Limits
Most of the default quotas will meet the requirements, but you will need to increase your vCPU quota to at least 40 in order to install OpenShift. I suggest a little headroom at 60.
Azure quotas or limits are region specific, so note the region you will use, and request a vCPU quota limit of 60 DCSv3 type. This requires “opening a ticket” with Azure, but the turn around seems to be essentially immediate.
Now that the quota request is in flight, continue by setting up DNS.
Delegating DNS to Azure
The OpenShift installer will create a DNS subdomain for the cluster. Additional DNS resource records will then be created in that subdomain for the API and application endpoints. There must be a parent domain in Azure which will host this cluster subdomain. Follow the tutorial on hosting your domain in Azure DNS to create a public hosted Zone in the ocp resource group then verify the delegation.
📓 Example: A cluster named
winand a base domain ofaz.domain.comrequires
- Azure DNS is authoritative for az.domain.com
- az.domain.com is a public DNS zone
- OpenShift installer can make changes to az.domain.com
- Cluster can create and modify win.az.domain.com
Replace your domain in the dig commands below to verify that resolution works from any host on the internet.
$ dig +short soa az.domain.com. @ns1-01.azure-dns.com
ns1-01.azure-dns.com. azuredns-hostmaster.microsoft.com. 1 3600 300 2419200 300

$ dig +short ns az.domain.com.
ns3-01.azure-dns.org.
ns4-01.azure-dns.info.
ns2-01.azure-dns.net.
ns1-01.azure-dns.com.
Creating an Azure Service Principal
The OpenShift installer will authenticate as an Azure application to provision the cluster resources.
The cloud credential operator will also use this credential to mint other more targeted credentials for use by the openshift-image-registry, openshift-ingress, and openshift-machine-api operators.
Because of this, our service principal must have both the Azure built-in roles Contributor and User Access Administrator and active Directory Graph permissions Application.ReadWrite.OwnedBy.
We cover all the necessary steps below, but this is also discussed in the installer repo. I should note there are alternative modes supported by the cloud credential operator to differently accomodate security requirements, but they are not covered here.
📓 Pro Tip: Credential requests can be examined with
yq$ oc adm release extract 4.7.8 --to=./ocp-4.7.8 $ yq eval '. | select(.spec.providerSpec.kind == "AzureProviderSpec") \ | (.metadata.name,.spec.providerSpec)' ocp-4.7.8/*.yamlopenshift-machine-api-azure apiVersion: cloudcredential.openshift.io/v1 kind: AzureProviderSpec roleBindings: - role: Contributor --- openshift-image-registry-azure --- apiVersion: cloudcredential.openshift.io/v1 kind: AzureProviderSpec roleBindings: - role: Contributor --- openshift-ingress-azure --- apiVersion: cloudcredential.openshift.io/v1 kind: AzureProviderSpec roleBindings: - role: Contributor
We will use environment variables and temporary files to collect the values needed in later steps. We will be working from a path held in $CLUSTER_DIR which looks like this example.
You can read the OpenShift docs for more context on the following procedure.
- Start by capturing the tenant
$az_tenant_idand subscription$az_idIDs.
$ az login
$ az account list --refresh
$ eval $(az account show | \
  jq -r '. | "export az_tenant_id=" + .tenantId + "\nexport az_id=" + .id')

$ echo "$az_tenant_id\n$az_id"
602ebb4e-9eea-4d29-8f4d-0000000000000
07490058-1a4c-46a3-af1d-0000000000000
- Create a service principal and an application registration while capturing the application ID
$az_app_idand password$az_app_passwordfrom the output.
$ az ad sp create-for-rbac --role Contributor --name ocp4win | tee day0/ocp4win-sp.json

$ eval $(cat day0/ocp4win-sp.json | \
  jq -r '.|"export az_app_id=" + .appId + "\nexport az_app_password=" + .password')

$ echo "$az_app_id\n$az_app_password"
7833aa9e-7880-4070-9f75-0000000000000
71MFrd_-RYdj-AJ1LgBD-lxS00000000000
- Now retrieve the object ID
$az_sp_object_idfrom this application registration.
$ export az_sp_object_id=$( \
  az ad sp list --filter "appId eq '$az_app_id'" \
  | jq '.[0].objectId' -r)

$ echo $az_sp_object_id
6172e1c9-39c5-4dc9-8065-000000000000
- Pause to confirm all values have been captured.
$ env | grep ^az_
az_app_id=7833aa9e-7880-4070-9f75-000000000000
az_app_password=71MFrd_-RYdj-AJ1LgBD-lx00000000000
az_id=07490058-1a4c-46a3-af1d-000000000000
az_sp_object_id=6172e1c9-39c5-4dc9-8065-000000000000
az_tenant_id=602ebb4e-9eea-4d29-8f4d-000000000000
Assigning permissions to the Service Principal
OpenShift installer will also create a new resourcegroup to hold the cluster resources. As of OCP 4.7, the ability to prescribe the resource group is not yet available.
📓 Mind the permission scope
With a default resource group ocp defined in
~/.azure/config, the scope of the User Access Administrator role is limited to this default resource group. Those permissions may not apply to the resource group created by the installer. In the example error message below that iswin-tmbv8-rgresource group.Error: authorization.RoleAssignmentsClient#Create: Failure responding to request: StatusCode=403 — Original Error: autorest/azure: Service returned an error. Status=403 Code=“AuthorizationFailed” Message=“The client ‘11392d17-7f56-4d12-ba42-000000000000’ with object id ‘11392d17-7f56-4d12-ba42-000000000000’ does not have authorization to perform action ‘Microsoft.Authorization/roleAssignments/write’ over scope ‘/subscriptions/
07490058-1a4c-46a3-af1d-000000000000/resourceGroups/win-tmbv8-rg/providers/Microsoft.Authorization/roleAssignments/99d7d680-3fa3-e9c5-26ac-000000000000’ or the scope is invalid. If access was recently granted, please refresh your credentials.”
- Assign
Users Access Administratorrole to service principal per the Azure docs. To avoid the error above, include a subscription scope.
$ az role assignment create --role "User Access Administrator" \
    --subscription $az_id \
    --assignee-object-id $az_sp_object_id \
    | tee day0/role-assignment.json

$ az role assignment create --role "Contributor" \
    --assignee-object-id  $az_sp_object_id | tee day0/role-assignment-contibutor.json
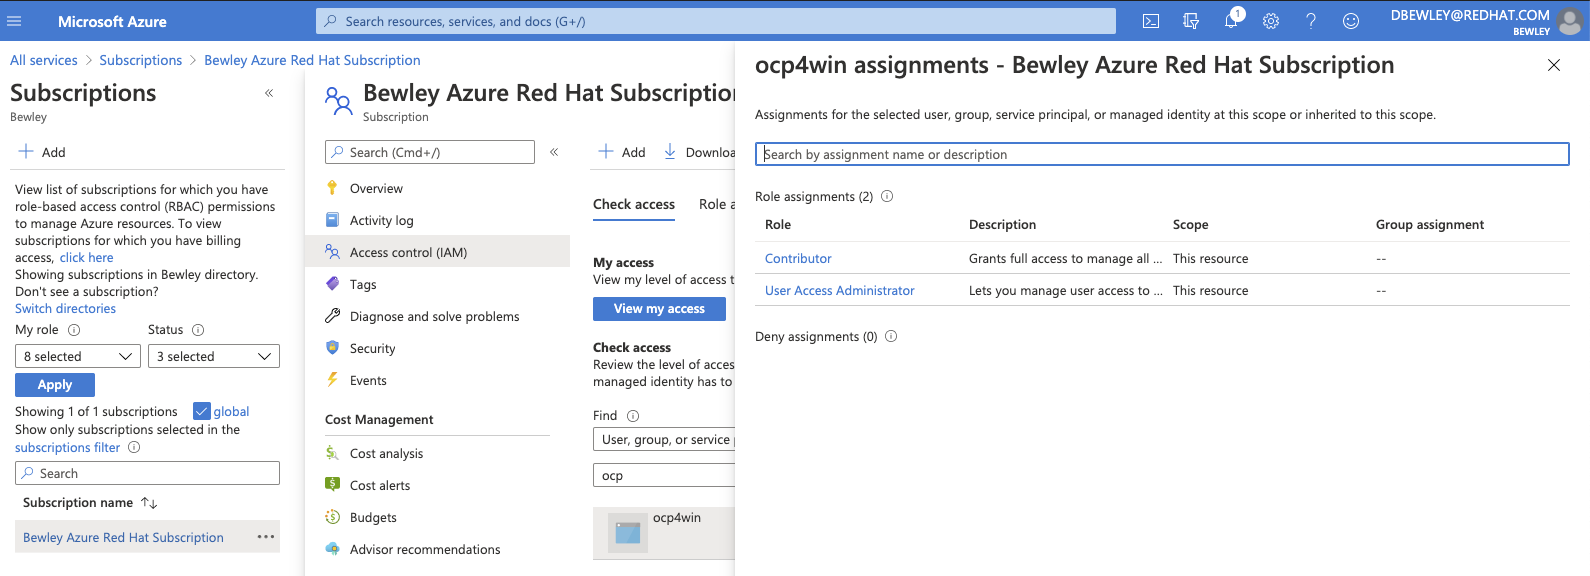
If scope was not included, to repair the error above, expand the scope in the portal:
- Portal → Subscription → Select Subscription → Access Control IAM → Role Assignments Tab → Add
- Select the service principal and add User Access Administrator role
- Select the role, the service principal, and save
- Assign the
Azure Active Directory Graphpermission.
📓 The GUID values below are literal and not placeholders.
# request graph api permission
$ az ad app permission add \
  --id $az_app_id \
  --api 00000002-0000-0000-c000-000000000000 \
  --api-permissions 824c81eb-e3f8-4ee6-8f6d-de7f50d565b7=Role
WARNING: Invoking "az ad app permission grant --id $az_app_id --api 00000002-0000-0000-c000-000000000000" is needed to make the change effective
- Now grant those added permissions as instructed by the output above.
$ az ad app permission grant \
  --id $az_app_id \
  --api 00000002-0000-0000-c000-000000000000 \
  | tee day0/app-permission-grant.json
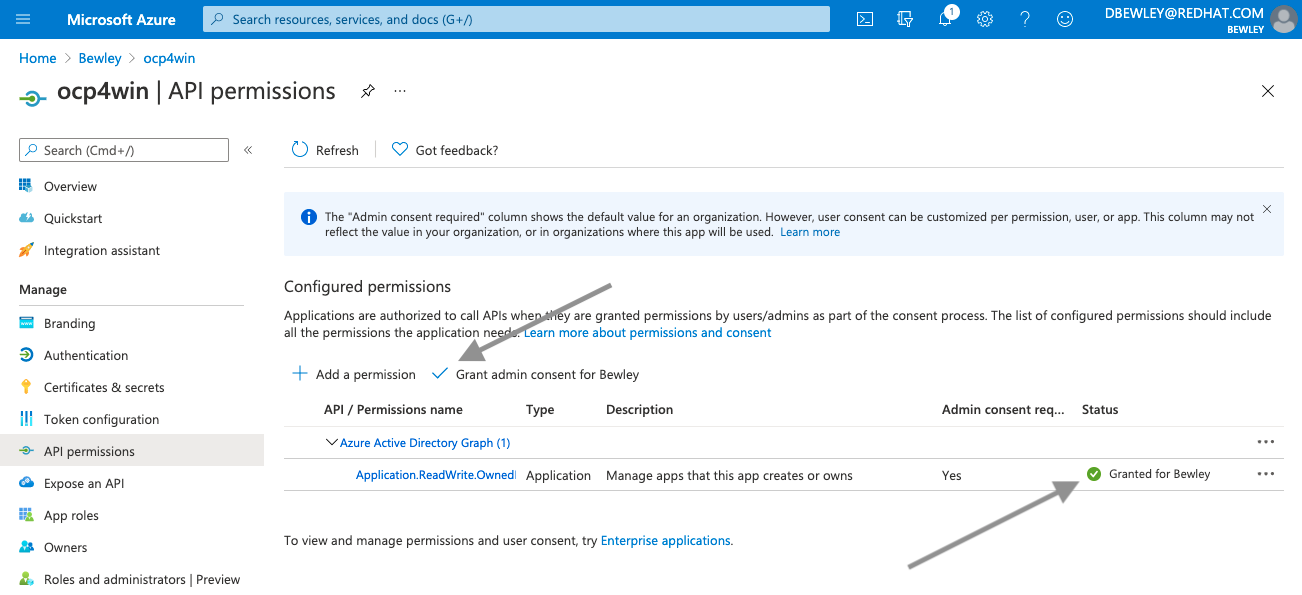
Finally, go to the Azure portal and make sure it is not waiting for Admin approval.
- Portal –> Azure Active Directory → App registrations → <display-name> → API permission
- Grant admin consent for <directory>
Installing OpenShift
Now Azure is good to go! Time to perform the OpenShift installation.
Obtaining the installation program
- Download your unique pull secret and save it somewhere safe like Keybase.
$ export PULL_SECRET=$(cat /Volumes/Keybase/private/dlbewley/credz/redhat/pull-secret.json)
- Download the
occlient andopenshift-installinstaller from the mirror or using my getoc script.
$ getoc
📓 Enabling Execution on MacOSX
It may be necessary to flag the downloads as safe for execution on MacOS. Ctrl-click in finder and open to bypass OSX signature check or use
spctl.$ spctl --add --label "OpenShift" openshift-installThe same may be done for the client.
$ spctl --add --label "OpenShift" oc
$ spctl --add --label "OpenShift" kubectl
$ spctl --enable --label "OpenShift"
- Confirm the versions downloaded. I use a script called ocver to switch between versions.
$ ocver 4.7
Linking clients to 4.7/macosx
Linking installer to 4.7/macosx
Linking noobaa to latest/macosx
Linking helm to latest/macosx

$ oc version --client
Client Version: 4.7.8

$ openshift-install version
openshift-install 4.7.8
built from commit fae650e24e7036b333b2b2d9dfb5a08a29cd07b1
release image quay.io/openshift-release-dev/ocp-release@sha256:7456516a64edf63268522565cf00dc581f1d7ad22355ffab8157a9e106cf607f
Generating an SSH key
We can generate an ssh key for installation debugging purposes, but we will use this same key for accessing the Windows node in part 2, so do not add a passphrase to this key.
$ ssh-keygen  -t ed25519 -C "$USER@az-win" -f ~/.ssh/az-win -N ""
$ ssh-add ~/.ssh/az-win
Generating an install-config.yaml
The OpenShift installation process uses an install-config.yaml file to understand how to build your cluster.
Let’s create an install config and make a few adjustments before continuing with the installation.
📓 Pro Tip: The interactive installer will request some details about your Azure account. We already captured them while Creating an Azure Service Prinicpal above.
Below is a description of how to obtain those values and some variables we used to store them for easier reference.
Installer Term Retrieval Var Azure subscription id az account show | jq .id$az_idAzure tenant id az account show | jq .tenantId$az_tenant_idAzure service principal client id az ad sp list --filter "displayName eq 'ocp4win'" | jq -r '.[].appId'$az_app_idAzure service principal client secret az ad sp create-for-rbac | jq .password$az_app_password
Refer to the above table when prompted by the installer for corresponding values.
A JSON file will be created in ~/.azure/osServicePrincipal.json from the values you provide, but it may be easier and less surprising to just generate it before creating the install config. Let’s do that instead.
- Create service principal json file from the values previously captured.
$ cat <<EOF > ~/.azure/osServicePrincipal.json
{
  "subscriptionId": "$az_id",
  "clientId": "$az_app_id",
  "clientSecret": "$az_app_password",
  "tenantId": "$az_tenant_id"
}
EOF
❗ Be sure to remove ~/.azure/osServicePrincipal.json before running openshift-install if you wish to use an alternate service principal.
- Create an OpenShift
install-config.yaml
$ export CLUSTER_NAME=win
$ export CLUSTER_DIR=$(git rev-parse --show-toplevel)/clusters/az-${CLUSTER_NAME}
$ mkdir -p $CLUSTER_DIR/day{0,1,2}
$ mv $CLUSTER_DIR/install-config.yaml{,.bak-$(date +%Y%m%d)}
$ openshift-install create install-config --dir="$CLUSTER_DIR"
- Adjust the install config to use
OVNKubernetesfor the network type as in this example install-config.yaml.
# modify the CNI type from OpenShiftSDN to OVNKubernetes
$ sed -i 's/OpenShiftSDN/OVNKubernetes/g' $CLUSTER_DIR/install-config.yaml
- Confirm that
OVNKubernetesis the network type
$ grep networkType $CLUSTER_DIR/install-config.yaml
  networkType: OVNKubernetes
📺 Watch Demo: Creating the
install-config.yaml
Enabling Hybrid Networking
Since Linux and Windows container networking have different methods of configuration, it is necessary to enable hybrid networking support in OpenShift.
This is an IPI installation which by definition is opinionated and requires very little input. We will be making a small, important customization for configuring OVN-Kubernetes with hybrid networking required to support Windows nodes. We will generate the installer manifests and insert a custom manifest before deploying the cluster.
- Generate the installer manifests after backing up the install config
$ cp -p $CLUSTER_DIR/install-config.yaml{,.bak-$(date +%Y%m%d)}

$ openshift-install create manifests --dir=$CLUSTER_DIR
INFO Credentials loaded from file "/Users/dale/.azure/osServicePrincipal.json"
INFO Consuming Install Config from target directory
INFO Manifests created in: /Users/dale/src/redhat/openshift-practice/clusters/az-win/manifests and /Users/dale/src/redhat/openshift-practice/clusters/az-win/openshift
- Create clusters/az-win/day1/cluster-network-03-config.yml as below and copy it to the manifests directory.
$ cat <<EOF > $CLUSTER_DIR/day1/cluster-network-03-config.yml
apiVersion: operator.openshift.io/v1
kind: Network
metadata:
  creationTimestamp: null
  name: cluster
spec:
  clusterNetwork:
  - cidr: 10.128.0.0/14
    hostPrefix: 23
  externalIP:
    policy: {}
  serviceNetwork:
  - 172.30.0.0/16
  defaultNetwork:
    type: OVNKubernetes
    ovnKubernetesConfig:
      hybridOverlayConfig:
        hybridClusterNetwork:
        - cidr: 10.132.0.0/14
          hostPrefix: 23
        # next line VMware provider only. see https://docs.microsoft.com/en-us/virtualization/windowscontainers/kubernetes/common-problems\#pod-to-pod-connectivity-between-hosts-is-broken-on-my-kubernetes-cluster-running-on-vsphere
        #hybridOverlayVXLANPort: 9898
status: {}
EOF

$ cp -p $CLUSTER_DIR/day1/cluster-network-03-config.yml $CLUSTER_DIR/manifests/
Deploying the cluster
With the Azure prerequisites complete, and this custom manifest in place it is finally time to deploy the cluster.
- Run the installer to create the cluster
$ openshift-install create cluster --dir="$CLUSTER_DIR" --log-level=debug
The installer will utilize the service principal we created to provision a temporary bootstrap node, and a control plane. Once that control plane is up the machine API operator will take over and provision our Linux worker nodes.
In another window monitor progress as follows.
📺 Watch Demo: Installing the cluster
Logging in to the cluster
- Copy the generated cluster credentials somewhere safe
$ mkdir /Volumes/Keybase/private/dlbewley/credz/ocp/$CLUSTER_NAME
$ cp -p $CLUSTER_DIR/auth/* /Volumes/Keybase/private/dlbewley/credz/ocp/$CLUSTER_NAME
- Pass credentials to
ocvia kubeconfig and login using my ocp script or simply define$KUBECONFIG.
$ export KUBECONFIG=$CLUSTER_DIR/auth/kubeconfig
Now interact with the cluster using oc or kubectl. The client will authenticate as system:admin using a certificate. No need to pass a username or a password.
$ oc version
Client Version: 4.7.8
Server Version: 4.7.8
Kubernetes Version: v1.20.0+7d0a2b2

$ oc get nodes
NAME                            STATUS   ROLES    AGE   VERSION
win-x8v2z-master-0              Ready    master   7h35m   v1.20.0+7d0a2b2
win-x8v2z-master-1              Ready    master   7h35m   v1.20.0+7d0a2b2
win-x8v2z-master-2              Ready    master   7h35m   v1.20.0+7d0a2b2
win-x8v2z-worker-westus-d5m68   Ready    worker   7h23m   v1.20.0+7d0a2b2
win-x8v2z-worker-westus-gj86n   Ready    worker   7h23m   v1.20.0+7d0a2b2
Starting Over
Once the Azure steps are complete, a reinstall of the cluster can be performed pretty quickly. This can be helpful for tweaks or trial an error.
📓 Pro Tip: Shorthand for recreating the OpenShift cluster.
$ openshift-install destroy cluster --dir="$CLUSTER_DIR" --log-level=debug
$ cp -p $CLUSTER_DIR/install-config.yaml{.bak-$(date +%Y%m%d),}
$ openshift-install create manifests --dir=$CLUSTER_DIR
$ cp -p $CLUSTER_DIR/day1/cluster-network-03-config.yml $CLUSTER_DIR/manifests/
$ time openshift-install create cluster --dir="$CLUSTER_DIR" --log-level=debug
Summary
OpenShift IPI installation automatically handled most of the heavy lifting for us. After preparing our Azure account and slightly customizing the installer inputs, we deployed an OpenShift cluster with a hybrid networking config ready to support Windows nodes.
Stay tuned for part 2 where we will use the WindowsMachineConfigOperator to do add a Windows node.